
Toilet tank leaking from bolts – When water leaks from toilet tank bolts, you should repair as quickly as possible. Any water leak, no regardless of how small, can be the worst nightmare for homeowners. It not only can cause significant damage to your house; however, it may create safety and health issues.
It is good to know that toilets that leak, especially when they are leaky from the bolts on the tank, they can be fixed easily. Let me guide you through it.
Fixing a Leaky Toilet
There are some areas where toilets could leak:
- The bottom or base (hopefully not)
- The main water line
- The connection between the tank and bowl/gasket
- The bolts
Each of them is a simple solution. The first involves removing the toilet and reinstalling the seal made of wax, which means it will take longer than the other ones.
When the issue is located on the main water line, then you’ll need to examine the connection hose and the water supply ballcock/inlet and replace them if necessary.
How to Fix a Toilet Leaking From the Tank Bolts
Before you begin, making sure that your kit includes all necessary parts and tools required to complete the repair, that’s not a lot and then move on to step 1.
- Screwdrivers and hand tools (always beneficial)
- Gloves and sponge
- Toilet Tank/Bowl Kit
Step 1: Inspect the Area and Determine Where the Water Is Coming From
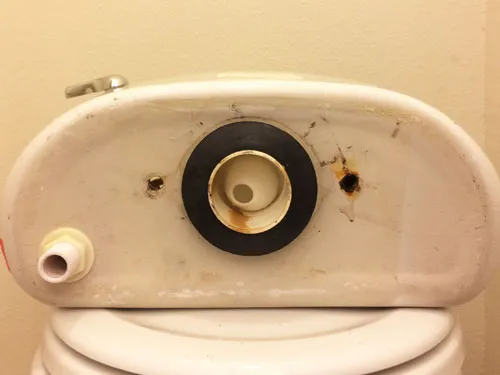
Before I could find out it was leaky from the tank bolts, I needed to examine the tank. There are several locations where a toilet could leak. Be sure to thoroughly inspect the location.
Leaks that originate from the bottom or from the main water line are easier to identify. If you examine the bowl and the tank and the bowl, you should be able to see and feel water between these two. Make sure to take your time to do this since it is essential to identify the parts or tools you’ll need to repair it.
After you’ve established whether the issue is actually emanating from the bolts on the tank and bolts, you are able to go ahead and purchase the Toilet Tank/Bowl Kit.
Step 2: Shut Off the Toilet Supply Valve, Flush the Toilet & Empty the Tank
The repair requires removing the toilet tanks completely. Prior to doing this, it’s an excellent idea to empty the tank.
For this, start by shutting off the water supply valve and flushing the toilet. You can then apply the sponge to remove the remainder of the water that remains in the tank.
Step 3: Disconnect the Water Supply Line
After you’ve confirmed your tank has been empty, you are able to proceed to disconnect your water line. Certain lines can be taken off with a hand, while others require an abrasive wrench or one of the channel locks. Be aware that some water could still escape through the ballcock.

Step 4: Remove Toilet Tank, Old Bolts
With the same wrench and channel lock pliers, take off the nuts that hold the tank in the position. They need to be not too tight, as it is suggested to tighten them manually to prevent damaging the porcelain tank or bowl.
If the bolts begin to spin and spin, you’ll need an appropriate screwdriver to secure them in the tank. If the bolt’s head is totally worn out (it occurs), then you might require an additional set of pliers to support them in place while you rotate the bolt.

Image Source: cheapesthouseontheblock.com
Removing toilet tank bolts. Once removed, put the tank in the toilet bowl or in any other location that is comfortable enough to allow you to perform work on it.
Step 5: Replace Tank to Bowl Gasket – Another Way to Fix a Leak Between the Toilet Tank and Bowl
It is an optional but highly suggested step that is highly recommended. It is the only step you must complete if there is a leak in your toilet from the tank onto the gaskets in the bowl.
In this instance, as you’ve already eliminated the tank, it is sensible to change the gasket also. I wouldn’t intend to fix the leak that is caused by the bolts, only to need to take the tank off after a couple of weeks to repair a leak in the gasket.

Removing the old toilet tank gasket. Image Source: cheapesthouseontheblock.com

Installing a new toilet tank gasket. Image Source: cheapesthouseontheblock.com
New toilet tank gasket. Image Source: cheapesthouseontheblock.com
Step 6: Install the New Bolts, Gaskets, Washers, and Nuts
In the toilet tank/bowl Kit, instructions indicated that you should make use of the bolt, a washer, and then a gasket made of rubber in the tank. Then on the bowl’s side, the gaskets, washers, and the nut.
In addition to protecting ceramic, I couldn’t think there was any reason to have that gasket added to the bowl’s edge. The idea is to prevent leaks from the bolts. Therefore, I chose to make it different.
You should not just put both washers and gaskets in the tank but also place the additional ones outside of the tank and secure them in place using the additional nuts. My opinion is that this double gasket arrangement is more effective as opposed to one gasket.

The new toilet tank gasket and bolts. Image Source: cheapesthouseontheblock.com

The new toilet tank gasket, bolts and extra gaskets and washers outside the tank – Image Source: cheapesthouseontheblock.com

Using the extra nuts to hold the extra gaskets and washers in place. Image Source: cheapesthouseontheblock.com
Then, I put in the brand new nuts and washers to fix the tank in place of the bowl, as explained in the next step.
Step 7: Reposition Tank, Install Extra Washers, and Nuts
In the previous section, once the bolts set is moved, the tank uses the additional washers as well as nuts to keep it in the correct position. As I mentioned earlier, don’t too tighten up the bolts because this could cause damage to the toilet bowl, the tank, or both.
Putting the toilet tank back in place. Image Source: cheapesthouseontheblock.com

Using the slip lock pliers to tighten the nut just a bit. Image Source: cheapesthouseontheblock.com
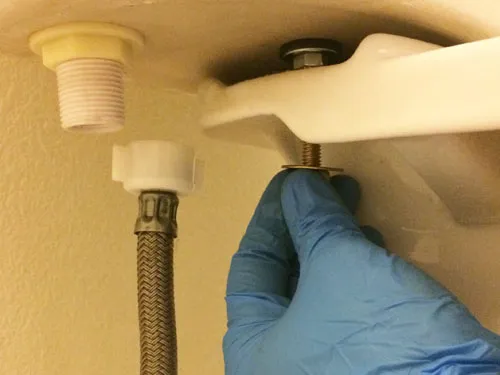
Step 8: Reconnect the Water Supply Line
After the toilet tank is returned to its original position, It is now time to go ahead and connect to the supply line for water. Be careful not to over-tighten this line either in the event that it could damage or break the threads of the ballcock or create leaks.

Reconnecting the toilet water supply line. Image Source: cheapesthouseontheblock.co
Step 9: Turn the Water Back on and Make Sure There Are No Leaks
Before proceeding to the next step, start by turning on the valve to supply water and inspect for leaks. It is recommended to check the main water connection that you just switched on, the connection to the tank/bowl, the gasket, and the bolts that you replaced. Make any adjustments you feel necessary.
Readers, have any of you faced the problem of a toilet that was leaking? Was it coming from one of the areas I listed? Did you like the experience?

