
How to Build a Bathroom? – Building a bathroom can be an intimidating task. There’s a lot of plumbing involved, and the stakes are high. Get something wrong, and you could end up with a nasty leak—or worse. So how do you ensure it all goes off without a hitch?
Look no further: we’re taking you through each stage of the question of how to build a bathroom-building process, from design to installation. You don’t need to be an expert plumber or carpenter—we’ll show you step-by-step how to construct your dream bathroom.
Whether you want to build a spacious master en suite or an extra powder room for guests, we’ve got all the tips and tricks you need to ensure success. Read on for the ultimate guide on how to construct a bathroom from scratch!
Decide on the Location to Build a Bathroom
If you’re ready to get started on your bathroom renovation project, the first step is to decide where it will be located. There are a few things to consider when it comes to location, such as what side of the house the bathroom should be on, and how much space you’ll have for your bathroom.
Ideally, you’ll want the bathroom to be close to the main bedroom. You may also want a window if possible; these can provide natural light and ventilation. If your budget allows, adding extra windows will improve your bathroom’s overall design. Finally, consider any potential challenges that may arise while constructing your new bathroom such as plumbing lines or sloping floors. Once you have a good idea of where your bathroom will be located and all existing conditions are taken into account, you can move on to the next step—planning out the layout!
Plan Your Bathroom Layout
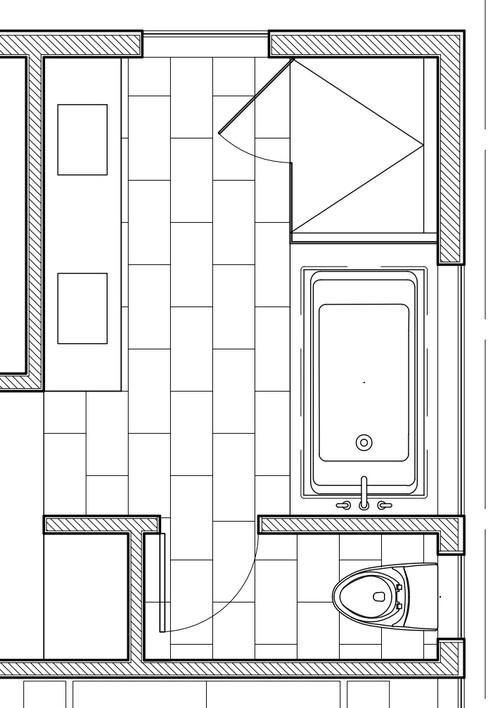
The next step in building your bathroom is to carefully plan the layout of the space. The key thing to consider is how you intend to use the bathroom and what fixtures and features need to be included. Are you worried about how to build a bathroom? So think are you only building a shower, or do you want a bathtub too? Do you need two sinks? Where does the toilet go?
Considering these questions ahead of time will help you figure out how much space you will need for your dream bathroom. You can also plan for where the fixtures and components should be placed, including toilet placements, vanity areas, shower niches, and storage space. This step is crucial in ensuring that your bathroom is well-designed and optimally functional for its users.
Don’t forget to measure before you make any purchases! Make sure that all of the components fit within your new bathroom’s measurements. Consider using graph paper or a floor plan app to help create a visual guide of where each feature should go. Doing this will make it easier to keep track of any changes while still maintaining an accurate picture of your work in progress.
Demolishing and Preparing for Construction
Now that you’ve decided on the layout and design of your bathroom, you need to demolish the existing one and prepare for construction. This can be a tricky process, especially if you’re dealing with an existing bathroom.
Remove all existing fixtures and any other materials that may interfere with the new plumbing works. Disconnect all existing electrical, plumbing, and ventilation services from your house to the bathroom. Make sure that the walls are even and in good condition before beginning any construction work—remove any plasterboard or other unsuitable materials from walls or ceilings. Clear out all debris and check that there is enough room for a standard-size bathtub or shower tray depending on your chosen design (you may have to adjust framing around the area).
These demolition tasks must be done carefully in order to ensure a sturdy, long-lasting foundation for your bathroom—take your time to carefully go through every step!
Install the Vanity and Cabinets | How to Build a Bathroom?
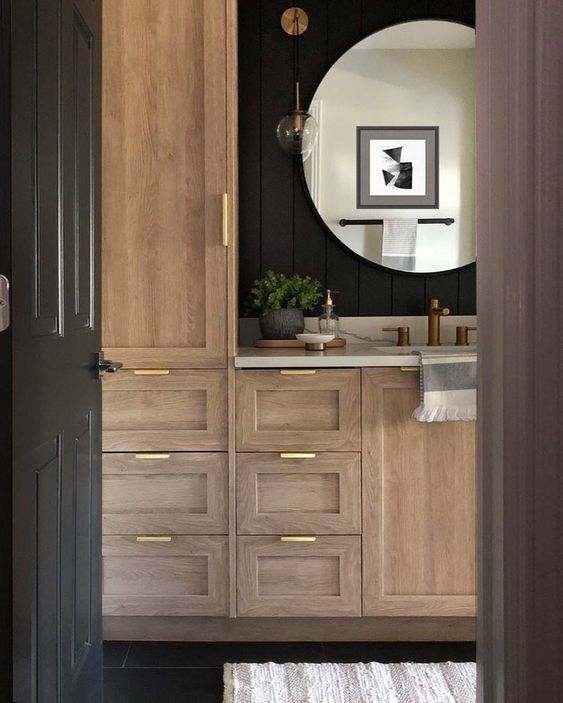
Installing the vanity and cabinets is a vital part of bathroom construction, so it’s important to get it right. Start by laying out the pieces where they need to go and then attaching them to the wall with screws.
Next, set the vanity top in place and secure it with construction adhesive. Then connect the drain assembly, making sure everything is tight and secure before you move on to the next step.
Connect all of your supply lines, making sure they’re secured properly and there are no leaks. The use of plumbers’ putty can help to ensure a water-tight seal. Once everything is connected, turn on your water supply and make sure everything is running smoothly and there aren’t any leaks or loose connections.
Now it’s time to attach the cabinets or wall-mounted storage unit. Take measurements for each cabinet or storage unit that needs to be installed, cut out holes for plumbing fixtures such as towel bars or toilet paper holders, and attach the cabinets with screws. Finally, seal any exposed edges with caulking to help prevent water damage.
Tiling the Walls and Ceiling
Tiling is one of the most important steps in constructing a bathroom — it sets the stage for the rest of the space. With a few supplies and some elbow grease, you can easily tile your walls and ceiling yourself.
Here’s what you’ll need and how to build a bathroom with these:
- Tile
- Tile adhesive
- Grout
- Tape measure
- Notched trowels
- Level and spirit level
- Sponge and bucket
- Tile cutter/grinder
- Preparation
The first step is preparation — using a spirit level, mark out points on your wall at a set height. Then, using painter’s tape, draw horizontal lines across your wall to create a grid. This will help you achieve an even surface, even when you start cutting the tiles to fit at corners or around pipes.
- Measuring and cutting tiles
Measure each wall section before cutting the tiles with a tile cutter. If you’re not confident about cutting curved or circular shapes, use either a tile grinder or hire a professional to do it for you.
- Applying tiles and grout
Using your notched trowel, spread the adhesive onto sections of the wall and carefully apply each tile. When each tile is in place, use grout to fill in any gaps between them. Wipe off any excess grout with a damp sponge in your area. When all tiles are in place, allow time for them to dry correctly before using them.
Once all tiles are secure, enjoy your brand-new bathroom! With these easy instructions, constructing your own bathroom is totally possible — just make sure you take your time with each task and get help if needed!
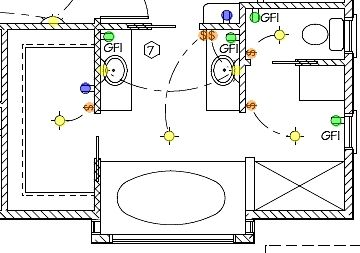
Installing Electrical Infrastructure
pinterest.com
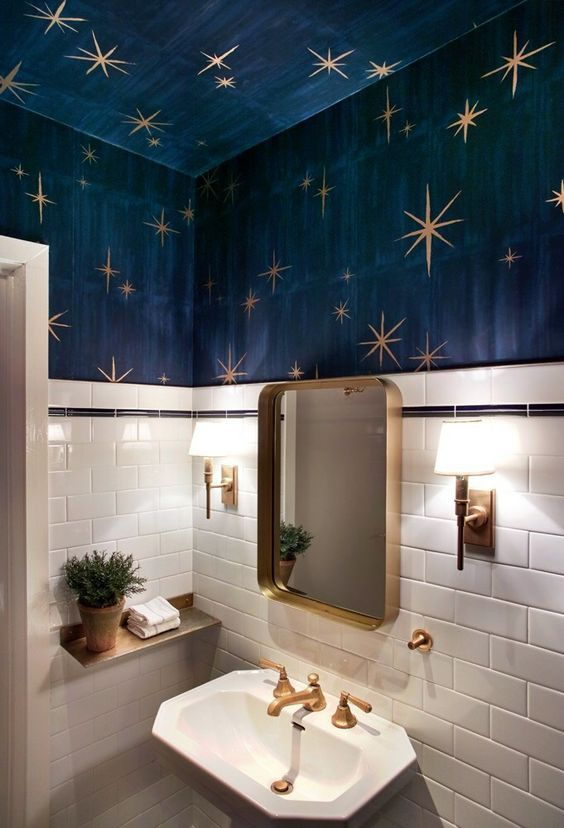
When building a bathroom, you’ve got to get the electrical infrastructure set up first. This includes installing wiring for lighting, ventilation, exhaust fans, and of course, the plug sockets for your hair dryer and straightener.
So, how do you go about doing it? Here’s a step-by-step guide:
Step 1: Make sure there’s an electricity supply available
First and foremost, you have to make sure there’s an electricity supply that can power your bathroom. If not, you’ll have to work with an electrician to get the power installed.
Step 2: Install wiring and boxes in the walls
The next step is to run conduit pipes through which your wiring will pass — these are usually in place already — followed by installing outlet boxes in the wall. You may need additional if there’s insufficient space for all of your outlets.
Step 3: Connecting cabling and switches
Once you’ve got the wiring installed in the walls, all that’s left is connecting cables for lights and switches — this part needs to be done with extreme care as damages may occur due to improper installation. Finally, make all required connections between light fixtures and plugs for each appliance.
By following these steps carefully and ensuring that everything is connected correctly, you can build a safe and reliable electrical infrastructure in your bathroom — voila!
Building the Plumbing System – How to Build a Bathroom?

pinterest.com
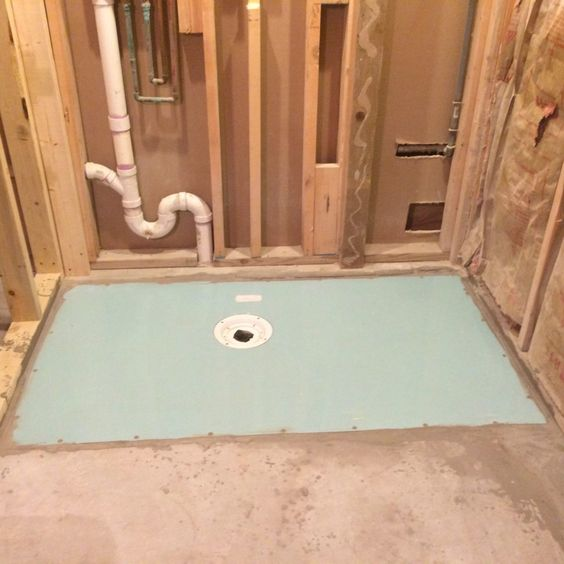
Once you’ve got the walls and floor down, it’s time to move on to the plumbing system. This consists of a few different parts that you’ll need to figure out before you get started.
- Plumbing Fixtures: You’ll need to choose what kind of sink, toilet, and shower/tub you want for your bathroom. Make sure to pick fixtures that coordinate with the design and style of the rest of your bathroom.
- Faucets: You’ll also need to pick out faucets for the sink, shower/tub, and any extra sinks or bars that you might be installing. Again, make sure they fit with the overall look you’re going for.
- Pipes: You’ll need a variety of pipes and fittings in order to connect all the fixtures together and make sure they are installed correctly. It’s important to be familiar with plumbing codes in your area before getting started on these steps.
Once all this is in place, you can turn on the water and make sure everything is working properly. It’s especially important to check for leaks at this stage, as they can cause a lot of damage if they are not caught early enough!
Install the Shower or Tub

pinterest.com
Time to add in the shower or tub. You can choose from a variety of styles, depending on the amount of space you have and whether or not you want a stand-up shower or a bath.
Often, tubs and showers are installed in a bathroom before any of the bathroom fixtures, such as toilets and sinks. This way, the plumber can easily access the drains for your toilet and sink to connect them to the fixtures.
If you are installing a shower, consider adding some tile around it for decoration. You may also want to use tile on the floor of your shower area to help keep water from seeping out onto your floors. To install your tub, begin by setting it into place and securing it with nails. Then add in any sealant or caulk needed to ensure that it is properly sealed. Finally, attach your faucets and showerhead according to your manufacturer’s instructions.
Adding in a shower or tub takes some time but with careful planning and following all safety precautions, you can create an amazing addition to your bathroom that will last for many years!
Fixing the Accessories
pinterest.com
Finally, it’s time to install the accessories—and this might just be the easiest part of the process of how to build a bathroom. You’ll want to start by installing the toilet, then attach the sink and mirrors, and finally, add towel racks or shelves.
You’ll need a few tools for this bathroom part:
- A drill: you’ll use this to anchor the fixtures into the wall
- Screwdriver: use this to adjust handle screws or tighten nuts on faucet stems
- Pliers: used for compressing pipe joints or cutting off excess wire
- Level: helps make sure everything is properly aligned
- Tape measure: used for measuring components and checking their placement.
Most pieces should come with their own instructions, so it’s a good idea to read carefully before you get started. It’s also important to remember that these accessories are relatively easy to replace if something goes wrong, so don’t be afraid to take your time and make sure everything is secure before you move on.
Conclusion on How to Build a Bathroom?
Whether you’re a pro or a DIY er, constructing a bathroom from scratch is no small feat. It requires careful planning, research, and patience to get the job done right. From laying the foundation for the room to the final touches in decor and accessories, there are a lot of steps to building a bathroom that you should consider before beginning a project of this magnitude.
But with the right guidance and know-how, you can successfully build a bathroom that’s comfortable, practical, and beautiful. If you take the time to plan and research the components of the bathroom, you’ll have a space that will be your haven for years to come.

